Pinball machine won't start? The most common causes and how to systematically troubleshoot the problem

There’s hardly a more frustrating moment for a pinball machine owner than when you flip the main switch and… nothing happens. No familiar click of a relay, no display lighting up, no general illumination, and not even the sound of a fan coming from the backbox. The pinball machine seems completely lifeless.
Especially if the pinball machine has been working reliably for many years or was purchased only recently, concerns quickly arise that there’s a serious defect in the electronics. In our experience, however, this is much less common than many people assume. In our workshop, we regularly see machines where the cause turns out to be a minor issue that can be quickly pinpointed through a systematic troubleshooting process.
That’s exactly why you shouldn’t start replacing fuses or removing individual circuit boards on a hunch. Without a systematic diagnosis, you often end up wasting a lot of time, spending money unnecessarily on replacement parts, and—in the worst case—even causing further damage. Instead, it’s best to examine the pinball machine step by step and first rule out all obvious causes.
The key here is not to search for the fault, but to find the area where the fault lies. Only once it is clear at which point the power supply is interrupted can the actual cause be reliably determined.
Not every “dead” pinball machine has a serious defect
A pinball machine consists of several modules that are powered sequentially. If one of these modules fails or is no longer receiving power, the machine often appears to be completely turned off from the outside. In fact, the electronics themselves may be perfectly fine.
The causes are particularly often found in areas that seem unspectacular at first glance. A damaged power cord, a blown fuse, a defective power filter, or a loose connector can be enough to cause the entire machine to show no signs of life.
Especially after transport, we frequently find that connectors between the cabinet and the backbox are no longer fully seated or were accidentally connected incorrectly during setup. To the owner, this initially looks like a total failure, even though the problem can be resolved in just a few minutes.
For this reason, every professional troubleshooting process always starts in the same place: with the power supply. Only once you’ve ensured that the pinball machine is receiving power properly is it worth checking the power supply unit, CPU, or other electronic components.
Stay calm and don’t order replacement parts right away
Anyone facing a pinball machine that won’t start for the first time often turns directly to the internet for a solution. There, possible causes are quickly listed, and new components are recommended just as quickly. This is exactly where many unnecessary expenses arise.
In our workshop, we regularly see power supplies, CPUs, or other components that have been replaced even though they were technically in perfect working order. The actual problem was often due to an interrupted power supply or a blown fuse.
A replacement part should therefore only be ordered once the defect has been clearly identified. Modern testing equipment makes it possible to check voltages and fuses within a few minutes. This allows many faults to be narrowed down without replacing a single component.
A structured troubleshooting process therefore not only saves money but also prevents functioning original parts from being replaced unnecessarily.
The power supply is always the starting point for any troubleshooting
Even though this step may sound obvious, every repair begins right here. Before opening the pinball machine or gathering tools, you should first check whether mains voltage is actually present at the machine.
This involves much more than just a quick glance at the power switch. Is the outlet actually working? Is the power cord undamaged? Was a power strip with a switch perhaps accidentally turned off? Especially in hobby rooms or basements, pinball machines are often plugged into multi-outlet power strips that also have their own switches or fuses.
Only once these issues have been reliably ruled out is it worth taking a look inside the machine.
For older Williams, Bally, Gottlieb, or Data East pinball machines, it’s also recommended to visually inspect the power cord and the IEC power plug. Over many years, mechanical stress or frequent plugging and unplugging can lead to wear and tear. Although modern Stern Pinball or Jersey Jack Pinball machines are affected by this much less frequently, this simple check should never be skipped.
A first glance inside often reveals more than expected
Once you’ve confirmed that the pinball machine is receiving mains power, you can open the cabinet. Even at this stage, you can often spot initial signs of a problem without using a single measuring device.
First, look for obvious changes. Are there any scorched areas? Are there any loose cables or connectors? Has a connector possibly come loose? Is there an unusual smell of scorched plastic or electronics?
It is precisely this first impression that often provides valuable information. Many defects are already visible long before any measurements are taken. A discolored plug or an overheated connection can already be a clear indication of the actual cause of the fault.
Take plenty of time for this visual inspection. Details are often discovered right here that later provide the decisive clue.
Why Fuses Are Rarely the Actual Problem
One of the most common reactions when a pinball machine won’t start is to reach for a replacement fuse. After all, it’s quick to check whether the thin wire inside is still there, and a new fuse costs only a few cents. However, this is precisely where many of the typical mistakes we see time and again in the workshop occur.
Although a fuse is also a wear-and-tear part, it doesn't simply break because it has gotten old. It blows because it is fulfilling its protective function and has detected a fault in the circuit. This means that while the fuse itself may be the cause of the problem, it may also be the result of another fault.
If it’s replaced without further inspection and the pinball machine is turned back on, exactly what you’d expect often happens: The new fuse blows as well. In the worst-case scenario, a fuse with a higher rating might even be used because there isn’t a suitable one on hand. This is strongly discouraged. Fuses are precisely matched to the respective circuit. A fuse that’s too large no longer provides adequate protection for the connected components and can cause significant consequential damage.
That’s why we always follow the same principle in our workshop: A blown fuse doesn’t answer the question of what’s broken—it merely indicates where the search should begin.
Why a Visual Inspection Is Often Insufficient
Many pinball machine owners hold a fuse up to the light and then decide whether it’s okay or not. With older glass fuses, this sometimes works, but you shouldn’t rely on it.
Fine hairline cracks or contact issues, in particular, are barely detectable to the naked eye. In addition, fuses can look completely normal on the outside even though they’re already electrically open.
For this reason, a digital multimeter is one of the most essential tools of all. Within a few seconds, you can determine whether a fuse actually still has continuity. At the same time, you can perform additional measurements that will be necessary for troubleshooting later anyway.
Anyone who frequently works on their pinball machine will sooner or later find that they simply can’t do without a multimeter. It’s part of every pinball machine owner’s basic toolkit—much like a set of screwdrivers or a socket set.
A multimeter doesn’t replace experience—but it makes the process much easier
Many beginners are initially intimidated by a multimeter. Ultimately, though, it’s simply a measuring device that provides information. It doesn’t determine the repair itself, but helps you draw the right conclusions.
In practice, troubleshooting usually begins with simple continuity or voltage measurements. Even these few tests are often enough to significantly narrow down the area of the fault.
An example from our workshop: A customer suspected a defect in the CPU board because his Williams pinball machine was no longer responding at all. The cause turned out to be an interrupted power supply behind a fuse holder, whose contacts had corroded over the years. The fuse itself was perfectly fine. Without a multimeter, this fault would have been very difficult to find.
Cases like this show that a structured diagnostic approach makes much more sense than simply replacing supposedly defective components.
The power filter is often overlooked
After checking the power supply and fuses, attention turns to a component that many owners are initially unaware of: the power filter.
Its function is to suppress interference from the power grid while also preventing the pinball machine itself from causing electromagnetic interference. Older machines, in particular, still have their original power filters, which are now several decades old.
In our workshop, we regularly encounter power filters whose plastic casings are already cracked or from which capacitors have leaked. In some cases, a faint, acrid odor is noticeable long before the actual defect becomes visible.
A damaged power filter can result in the pinball machine receiving no power at all or tripping the house circuit breaker as soon as it is turned on. That is why this component is an essential part of any systematic troubleshooting process.
Many of these defects can be identified simply through a careful visual inspection. Discoloration, scorched connections, or leaking components are clear indications that the power filter should be examined more closely or replaced.
The transformer is the heart of the power supply
Once the mains current has passed through the power filter, it reaches the transformer. Its job is to convert the mains voltage into the various voltages required by a pinball machine.
Depending on the manufacturer and model, different voltages are generated for lighting, coils, displays, and the electronics. If the transformer fails completely or is no longer receiving the correct power supply, the entire machine will cease to function.
A transformer failure is much less common than many people assume. Nevertheless, it’s worth taking a close look at the connecting wires and plug connections. Especially with older Williams, Bally, or Data East machines, screw connections can loosen over the years or contacts can oxidize.
Here, too, the same rule applies: Not every component that looks old is actually defective. Likewise, a transformer that looks clean does not automatically mean that all voltages are present correctly. Only through measurements can one reliably assess whether the transformer is functioning properly.
The Power Supply Unit—the Actual Distributor of Supply Voltages
Once the mains power has passed through the transformer, the various voltages reach the power supply unit. There, they are processed and distributed to the individual assemblies of the pinball machine. Only when these supply voltages are stable can the CPU, sound boards, displays, and all other components function properly.
In our workshop, we often find that a power supply unit is prematurely deemed defective. In reality, however, the cause often lies upstream. For example, if an input voltage is missing or a connector is disconnected, the power supply unit cannot fulfill its function at all. That is why we never consider the power supply unit in isolation, but always as part of the entire power supply system.
Older Williams WPC, System 11, or Bally machines, in particular, show typical signs of aging on connectors and solder joints over the years. High thermal stress causes contact resistance, which initially leads only to sporadic problems. Later, the power supply to individual modules may fail completely.
For this reason, it’s worth inspecting not only the circuit board itself but also all connectors.
Discolored connectors are almost never a coincidence
One aspect that many owners initially underestimate is connectors. Yet they are among the most common sources of failure.
When a high current flows through a contact over many years, heat is generated. This heat causes plastic to discolor and metal contacts to lose their spring force. The result is poor contact, voltage drops, and ultimately the failure of individual components.
If you discover a connector that has turned brownish or is even slightly melted, you should not ignore it. Such changes do not occur without reason. Rather, they are a clear indication that a problem has existed at this point for an extended period of time.
In our workshop, we therefore often replace not just individual contacts, but overhaul entire connectors. This is the only way to permanently ensure that the power supply functions reliably again.
Cold solder joints are among the classic signs of aging
In addition to connectors, solder joints also play a crucial role. Decades of temperature fluctuations, vibrations, and mechanical stress can cause fine hairline cracks to form that are barely visible to the naked eye.
These so-called cold solder joints cause electrical connections to be interrupted either temporarily or permanently. What makes this particularly tricky is that the fault does not always occur consistently. Some pinball machines initially operate without issues and only suddenly fail after a few minutes or hours.
Power supplies and heavily loaded power boards, in particular, should therefore always be carefully inspected for suspicious solder joints. A dull surface or fine ring-shaped cracks around the pin legs are typical signs of a failing connection.
The CPU Is Often Wrongly Suspected
As soon as a pinball machine fails to start up, suspicion quickly falls on the main board. This is understandable; after all, it controls nearly all of the machine’s functions.
However, our experience consistently reveals a different picture. In most cases, the CPU is not the cause of the problem, but merely the first component to lose its power supply.
You can think of the CPU as the control unit of a car. If it lacks the necessary voltage, it naturally ceases to function. However, this does not automatically mean that the CPU itself is defective.
Before even considering replacing the CPU, all power supply voltages should be checked. Only when it has been verified that these voltages are present correctly and the board still shows no response is further diagnosis warranted.
Modern Stern Pinball or Jersey Jack Pinball machines, in particular, often feature status LEDs or diagnostic indicators on their control boards. These provide important clues right from power-up as to whether the CPU is starting up correctly or if an error is already present.
Modern Pinball Machines Help with Troubleshooting
While older machines can often only be checked through measurements, many modern pinball machines have extensive diagnostic functions.
Status LEDs on circuit boards, self-tests, or built-in diagnostic programs make troubleshooting considerably easier. Nevertheless, the same principle applies here: these functions are only helpful if the pinball machine starts up at all.
If the machine remains completely non-functional, even with modern machines, any diagnostic process begins at the same point as with a Williams pinball machine over 30 years old—namely, with the power supply.
This is precisely why the initial diagnostic steps for classic and modern pinball machines differ far less than many people assume.
Patience is often the most important tool
Anyone who wants to fix a problem as quickly as possible is easily tempted to change several things at once. A fuse is replaced, then a connector is unplugged, followed by the removal of a circuit board, and finally, a different power supply is tried.
Before long, no one knows which change had which effect.
That’s why we follow a simple rule in our workshop: Always make one change at a time.
If a connector is being checked, everything else remains unchanged. If a voltage is being measured, the next step is taken only after that. This structured approach ensures that faults can be clearly isolated and repairs remain traceable.
Especially for extensive restorations or machines that have been out of service for a long time, it’s also advisable to take notes or snap photos. Modern smartphones make it easier than ever to document connector arrangements or cable routing before disassembly. These photos often save a lot of time during reassembly later on.
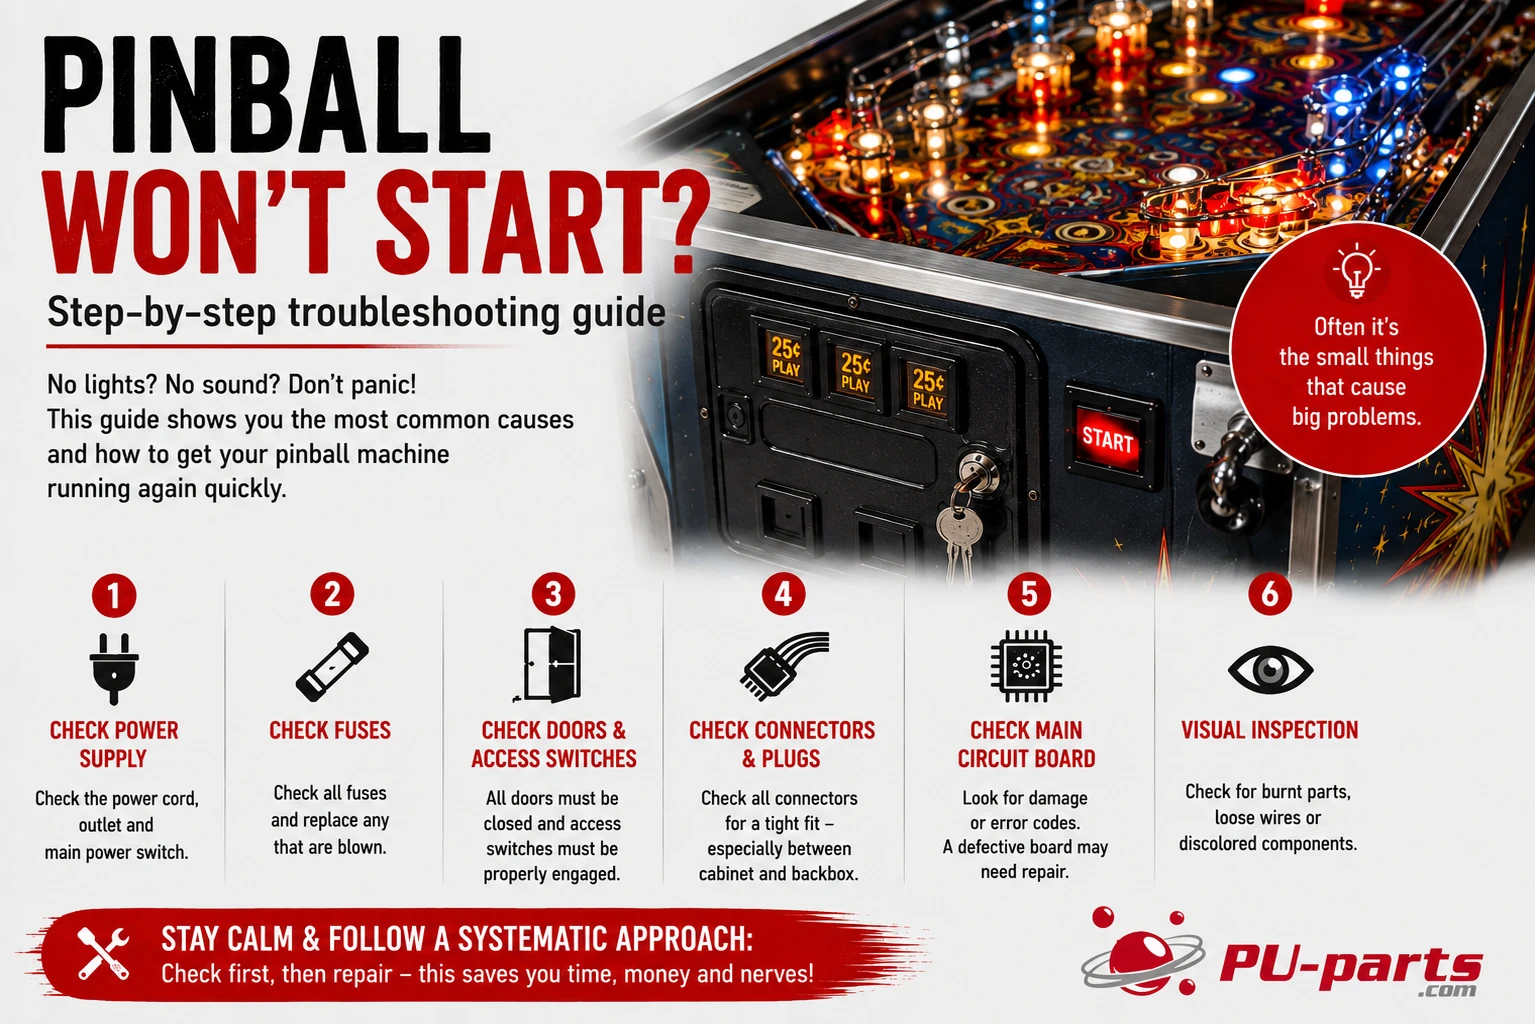
This is how professional technicians approach troubleshooting
Anyone opening a pinball machine for the first time is often surprised by how many cables, connectors, and circuit boards are inside. It’s easy to get the impression that troubleshooting must be complicated. In fact, however, the opposite is true.
Experienced technicians rarely rely on “trial and error.” Instead, they follow a set procedure that has proven effective for decades. The goal isn’t to replace as many components as possible, but to narrow down the fault step by step.
The sequence is almost always the same:
First, check whether mains voltage is present at the machine. Next, check the power cord, main switch, and power filter. After that, check the fuses and the various supply voltages. Only once this basic power supply is confirmed to be functioning properly do the power supply unit, CPU, and the remaining electronic assemblies become the focus.
This approach may seem a bit more time-consuming at first, but it often saves many hours of work in the end. Above all, it prevents functioning original components from being replaced unnecessarily.
Differences Between Older and Modern Pinball Machines
Even though pinball machines have undergone significant technical advancements in recent decades, the basic principle has remained virtually unchanged. Every machine requires a stable power supply, functioning fuses, and properly working electronics.
Older machines from Williams, Bally, Gottlieb, Data East, or Sega usually have a straightforward electronic architecture. Many faults can be reliably narrowed down here with a multimeter and a little patience. Typical signs of aging include oxidized pin contacts, aged fuse holders, worn connectors, or cold solder joints.
Modern pinball machines from Stern Pinball, Jersey Jack Pinball, Chicago Gaming Company, or American Pinball, on the other hand, feature significantly more powerful control systems, switching power supplies, and extensive diagnostic functions. Status LEDs, self-tests, and service menus make troubleshooting considerably easier. Nevertheless, even with these machines, every diagnostic process begins with the same fundamentals: Is the required supply voltage even present?
This point is often underestimated. Modern electronics can only function if they are reliably supplied with power. That’s why the first steps in troubleshooting a current Stern pinball machine are hardly any different from those for a Williams machine that’s over 30 years old.
When should you call in a professional service provider?
Not every problem can be fixed on your own without experience or the right tools. If you’re unsure or don’t have the means to safely measure voltages, you shouldn’t take any unnecessary risks.
Particular caution is required when dealing with mains voltage. Even in the input section of a pinball machine, voltages are present that can be life-threatening if handled improperly. Work on open machines should therefore only be performed if you have the necessary expertise.
Extensive repairs to power supplies, high-voltage components, or complex control boards should also be left to experienced professionals. In many cases, it is more cost-effective and safer to have individual assemblies professionally repaired rather than causing further damage through failed attempts.
A thorough diagnosis is especially worthwhile for rare or high-value collector’s items. Original circuit boards are often difficult to obtain and should be preserved whenever possible.
Reaching Your Goal with Structured Troubleshooting
A pinball machine that no longer starts up does not automatically mean costly electronic damage. On the contrary: Many causes lie in the power supply or in the connectors and can be reliably narrowed down using a systematic approach.
Those who take the time to check the individual components step by step not only gain a better understanding of their pinball machine but also avoid unnecessary spare part purchases. It is precisely this approach that forms the foundation of every successful repair—regardless of whether it’s a classic Bally pinball machine from the 1980s or a current model from Stern Pinball.
In the following articles on our knowledge portal, we’ll go into much greater detail about the individual assemblies. Among other things, we’ll show you how to properly test fuses, what voltages should be present at a power supply, and how to identify typical faults in connectors or circuit boards.
After all, the better you understand your pinball machine, the easier it will be to fix many problems yourself in the future.
Suitable Replacement Parts and Tools
If, during troubleshooting, it turns out that a component actually needs to be replaced, you’ll find a wide selection of replacement parts and tools for numerous pinball manufacturers in the PU parts product range. These include fuses, fuse holders, connectors, power supplies, cables, electronic components, and measuring tools for maintenance and repair.
Especially when it comes to electrical components, we recommend using only compatible, high-quality replacement parts. This is the only way to ensure that your pinball machine will function reliably over the long term.
FAQ - Pinball wont start
Why won't my pinball machine turn on?
If your pinball machine shows no signs of life, the most common causes are related to the power supply. Typical issues include a lack of mains power, a blown fuse, a faulty line filter, a damaged power cord or a loose connector inside the cabinet.
Can I simply replace a blown fuse?
A blown fuse should never be replaced without first identifying the cause. Fuses are designed to protect the electrical circuit and usually blow because of a fault or overload. Always use the correct fuse type and amperage specified by the manufacturer.
How can I check if a fuse is still working?
The safest and most reliable method is to test the fuse with a digital multimeter using the continuity or resistance setting. A visual inspection alone is not always sufficient, as a fuse may appear intact while being electrically open. Always disconnect the machine from mains power before performing any measurements.
Do I need a multimeter for troubleshooting?
A digital multimeter is one of the most important tools for diagnosing electrical problems. It allows you to test fuses, continuity and supply voltages. Measurements on a powered machine should only be carried out by people familiar with electrical safety procedures.
Is the CPU board usually defective if the machine won't start?
No. In many cases the CPU board is not receiving the required supply voltage because of a power supply issue, a blown fuse or a faulty connector. The CPU should only be considered faulty once all required voltages have been verified.
Can transporting a pinball machine prevent it from starting?
Yes. Transportation can loosen connectors, especially between the cabinet and the backbox. After moving a machine, all accessible connectors should be checked carefully. Always unplug the machine before opening it.
Why does a fuse look fine even though it is defective?
Glass fuses can develop very small internal breaks that are almost impossible to see. In addition, corroded fuse holders or poor electrical contacts may interrupt the circuit even if the fuse itself is still good. Electrical testing is therefore far more reliable than a visual inspection.
What do discoloured or melted connectors indicate?
Discoloured or melted connectors are usually caused by excessive heat due to poor electrical contact. In many cases the connector housing, terminals and matching header pins should all be replaced to restore a reliable electrical connection.
Can a faulty line filter completely disable a pinball machine?
Yes. If the line filter fails internally, mains voltage may never reach the transformer or power supply. A defective line filter may also trip a circuit breaker or residual current device (RCD) when the machine is switched on.
What should I check if only some LEDs or fans are working?
Partial signs of life indicate that at least part of the power supply is functioning. Make a note of which LEDs, fans or diagnostic indicators are active, as this information helps narrow the fault down to a specific voltage rail or circuit.
Can I install a higher-rated fuse if the correct one keeps blowing?
No. Installing a fuse with a higher current rating can prevent proper circuit protection and may cause severe damage or even create a fire hazard. If the correct fuse blows repeatedly, the underlying fault must be located and repaired first.
When should I contact a professional repair service?
Professional assistance is recommended whenever repairs involve mains voltage, power supplies or complex circuit boards. It is also advisable if you discover burn marks, repeatedly trip the building's circuit protection or cannot identify the fault after systematic troubleshooting.